In this post I will tell you my method(trick) of adding SVG images in a blogger website or blog.
Before starting, the first thing I am assuming is that you are aware of SVG if you are here. If not please see Scalable Vector Graphics
Recently when I tried to embed a SVG image for a post on pygal, I tried uploading the SVG file and blogger Image uploader came up with an error, because of which I had to find some other way.
I started searching Google "Embed SVG in Blogger". I found blogorrhea, which gave some information on adding SVG directly as a markup, which worked, but I faced another problem using this. Also this guy has used lot of Javascript which was confusing for me, being new to using SVG.
So I first thought of learning on how to embed SVG in HTML and this one worked out. Actually we can embed SVG in HTML in following ways:
And one thing, Out of the five options which I gave you, img tag(option 4) doesn't seem to work properly.
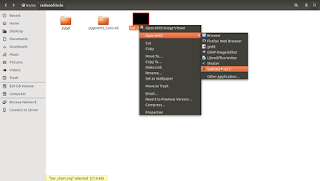
After you have created your SVG file, right click(or ctrl+click on mac) on the file and open it with your favorite text editor(Ex: Notepad++, sublime, gedit, emacs, vim etc.). I have attached a picture taken on ubuntu and a similar thing follows for other OS also.
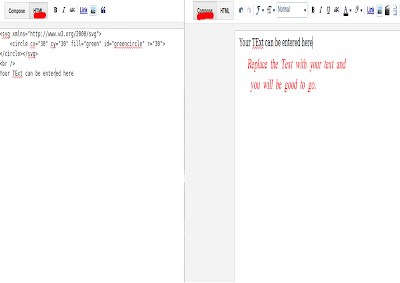
Now after you have opened the file, then copy(ctrl+c or cmd+c) all the code to the clipboard. Open your blogger dashboard and select "HTML" tab.
Finally Paste all the code that you have copied.
That's it you are done. You should publish your post to see if it is working or not.
Only problem I faced with this method was that, as blogger text editor will not be able to render the SVG code you have entered, you will not find the cursor to enter the other part of your post/another SVG markup. Now you have two options to overcome this problem. Go back to the HTML Tab and at the end of the SVG code, type the following:
After you enter at least one word you will be able to see that word in the compose editor and you can continue writing your post.
Or else complete writing all the text and then you can add the SVG.
Before we continue further with other options, we will have to host our SVG files so that we can use them on our blog.
After searching lots and lots of sites I have found svgur. This site is free you can host your SVG Vector graphics here.
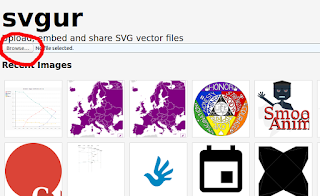
So first open svgur.com in your favorite web browser and click on the Browse button to select your SVG file.
After you have uploaded the SVG file add a name to your file write description of the file if you want and click on share.
After you have clicked the share button you will see a webpage with rendered svg file and related links:
Now it becomes simpler after you have completed uploading the SVG file
In the "data" attribute replace the link with yours.
As blogger is going to be https from April 2016 on wards, there will be security issues and you will be seeing "Secure Connection failed " in the iframe instead of seeing your SVG image. So this will be a problem for you.
Anyways I will also explain this option so that in any case you can use it.
Copy the HTML, Iframe(Blog, Website) code from the svgur page directly and paste it in the HTML tab of blogger. The code will look something like this:
Replace src attribute with your link and it will work if you are not on https or if you are on http.
Replace the src attribute value with your link and you will be good to go.
Replace the src attribute value with your link.
If you use this tag you will not be able to have the same functionality that original SVG has. So my opinion is that instead of hosting the SVG file on some host, I think it would be better if you would convert the file to some image format supported by blogger like PNG/GIF/ JPEG.
Anyways if you want to use it the same way then you shouldn't be having any problems using this tag.
Even though we have a hack to get survived, I think it would be better if google will allow us to upload SVG vector graphic files also.
Anyways I don't really know the reasons behind the scene on why google has not given option for uploading SVG files. Everyone has their own problems. If you do know on why google is not allowing us to upload SVG files, please do let me know. I will be happy to hear from you.
I have tried each and every part of this post to check whether it works or not. It worked for me and thus I am sharing. But if it doesn't work for you please do let me know and we can sort it out.
Finally if you think that I have missed any part in this post, or if you want me to add anything, don't feel shy to comment in the comment box below or to contact me. I will be glad to help you. Also comment if you know any other site in spite of svgur so that blogger community will get benefited and also even if svgur site goes down, people can use alternative.
Hope that this post has helped solve your problem.
Thank you. Have a nice day.
2) Embed SVG in SVG
3) How to add SVG in your Web Pages
4) SVG basics - How to work with SVG's
Before starting, the first thing I am assuming is that you are aware of SVG if you are here. If not please see Scalable Vector Graphics
Recently when I tried to embed a SVG image for a post on pygal, I tried uploading the SVG file and blogger Image uploader came up with an error, because of which I had to find some other way.
 |
| SVG File upload Error in Blogger |
So I first thought of learning on how to embed SVG in HTML and this one worked out. Actually we can embed SVG in HTML in following ways:
- Using Object tag
- Using Iframe tag
- Using embed tag
- Using img tag
- Using inline SVG
And one thing, Out of the five options which I gave you, img tag(option 4) doesn't seem to work properly.
1) Using Inline SVG(Recommended)
This is one of the easiest way for embedding SVG vector files in blogger.After you have created your SVG file, right click(or ctrl+click on mac) on the file and open it with your favorite text editor(Ex: Notepad++, sublime, gedit, emacs, vim etc.). I have attached a picture taken on ubuntu and a similar thing follows for other OS also.
 |
| Screenshot on how to open a SVG file on ubuntu |
 |
| HTML Tab in Blogger Dashboard |
 |
| SVG Markup pasted in HTML tab |
Only problem I faced with this method was that, as blogger text editor will not be able to render the SVG code you have entered, you will not find the cursor to enter the other part of your post/another SVG markup. Now you have two options to overcome this problem. Go back to the HTML Tab and at the end of the SVG code, type the following:
<!--After your SVG markup-->
<br />
Enter here what ever you want.
Or else complete writing all the text and then you can add the SVG.
 |
| HTML and Compose with SVG markup added - Blogger Dashboard |
Before we continue further with other options, we will have to host our SVG files so that we can use them on our blog.
After searching lots and lots of sites I have found svgur. This site is free you can host your SVG Vector graphics here.
So first open svgur.com in your favorite web browser and click on the Browse button to select your SVG file.
 |
| svgur.com home page and the browse button |
 |
| SVGur.com Adding name and description to the file uploaded |
 |
| SVGur.com uploaded svg file links |
2) Using the object tag
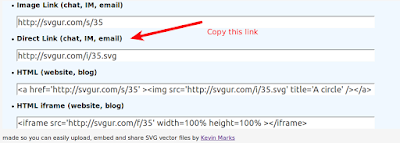
Copy "Direct link" from your svg file page and then copy the following HTML in your HTML tab in blogger dashboard:<object data="http://svgur.com/i/35.svg" type="image/svg+xml"> Please Use modern Browser to see this SVG! </object>
 |
| Direct Link of the SVG file uploaded and to be used |
3) Using Iframe(Not recommended)
Before we continue our discussion on using this option I would like to tell you a drawback.As blogger is going to be https from April 2016 on wards, there will be security issues and you will be seeing "Secure Connection failed " in the iframe instead of seeing your SVG image. So this will be a problem for you.
Anyways I will also explain this option so that in any case you can use it.
Copy the HTML, Iframe(Blog, Website) code from the svgur page directly and paste it in the HTML tab of blogger. The code will look something like this:
<iframe src='http://svgur.com/f/35' width=100% height=100% ></iframe>
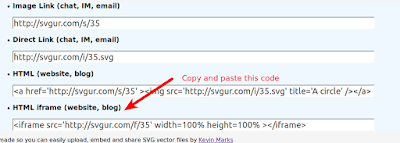 |
| Iframe Code for SVG file on svgur |
4) Using embed Tag
Paste the following code in your HTML tab in blogger dashboard.<embed type="image/svg+xml" src="http://svgur.com/i/35.svg" />
 |
| Link for embed tag src attribute |
Replace the src attribute value with your link and you will be good to go.
5) Using img tag
It is just like using the simple img tag in html. Paste the following code in your HTML<img src='http://svgur.com/i/35.svg' title='A circle' />
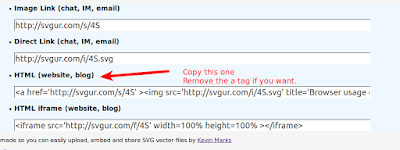 |
| SVG file img tag |
If you use this tag you will not be able to have the same functionality that original SVG has. So my opinion is that instead of hosting the SVG file on some host, I think it would be better if you would convert the file to some image format supported by blogger like PNG/GIF/ JPEG.
Anyways if you want to use it the same way then you shouldn't be having any problems using this tag.
Summary
I think I have covered all the required content in a easy to understand manner so that every person will be comfortable using this. If you have any doubt or didn't understand anything then please do comment in the comment box below and I will be glad to help you.Even though we have a hack to get survived, I think it would be better if google will allow us to upload SVG vector graphic files also.
Anyways I don't really know the reasons behind the scene on why google has not given option for uploading SVG files. Everyone has their own problems. If you do know on why google is not allowing us to upload SVG files, please do let me know. I will be happy to hear from you.
I have tried each and every part of this post to check whether it works or not. It worked for me and thus I am sharing. But if it doesn't work for you please do let me know and we can sort it out.
Finally if you think that I have missed any part in this post, or if you want me to add anything, don't feel shy to comment in the comment box below or to contact me. I will be glad to help you. Also comment if you know any other site in spite of svgur so that blogger community will get benefited and also even if svgur site goes down, people can use alternative.
Hope that this post has helped solve your problem.
Thank you. Have a nice day.
References
1) Using SVG with HTML5 tutorial2) Embed SVG in SVG
3) How to add SVG in your Web Pages
4) SVG basics - How to work with SVG's